June 29, 2013

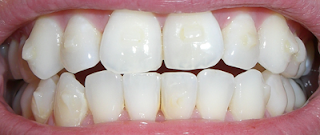
Progress weeks 47-48 after FINAL TRAY...or is it?

Below are the pictures after the final tray in my plan. Not gonna lie I was pretty stoked thinking I was done with this after almost a year....however...I got my attachments taken off at the dentist and we decided that additional trays would be needed to correct some teeth that were still kind of out of line. At the end of the day it was my decision and, after all, the additional trays will be at no cost since the plan was paid for in full.

I'll be writing more about getting my attachments removed and why I choose to get additional trays tin my next post. Stay tuned! In the mean time here are the "final" photos. Check out My Progress page for before and after shots to date.


Front View
Top View
Bottom View
Left View
Right View


Progress Weeks 45-46

Just catching up since it's been a couple months since I've posted.

Below are Images After: Tray 23   (taken on 5/20/2013)
Remaining Trays in Treatment: 1


Front View
Top View
Bottom View
Left View
Right View


Progress Weeks 43-44

Just catching up since it's been a couple months since I've posted.

Below are Images After: Tray 22   (taken on 5/6/2013)
Remaining Trays in Treatment: 2


Front View
Top View
Bottom View
Left View

Right View


Progress Weeks 41-42

Just catching up since it's been a couple months since I've posted.

Below are Images After: Tray 21   (taken on 4/21/2013)
Remaining Trays in Treatment: 3

The lighting in my bathroom is crazy and very yellow. As you can see (in the second image) at the wrong angle the teeth start looking pretty dingy!

Front View
Top View
Bottom View
Left View
Right View


Progress Weeks 39-40

Just catching up since it's been a couple months since I've posted.

Below are Images After: Tray 20   (taken on 4/6/2013)
Remaining Trays in Treatment: 4
Important Note:  As you proceed through the length of your treatment, you start to understand how your teeth move and how they feel. You tend to wear your trays less than you intend and day's start "slipping" - in this case I slipped one day and used this tray 15 days (instead of 14) before I changed it.


Front View
Top View
Bottom View

Left View
Right View


Progress Weeks 37-38

Just catching up since it's been a couple months since I've posted.

Below are Images After: Tray 19   (taken on 3/24/2013)
Remaining Trays in Treatment: 5


Front View
Top View
Bottom View
Left View
Right View


Progress Weeks 35-36

Just catching up since it's been a couple months since I've posted.

Below are Images After: Tray 18   (taken on 3/10/2013)
Remaining Trays in Treatment: 6
Important Note:  As you proceed through the length of your treatment, you start to understand how your teeth move and how they feel. You tend to wear your trays less than you intend and day's start "slipping" - in this case I slipped one day and used this tray 15 days (instead of 14) before I changed it.

Front View
Top View
Bottom View
Left View
Right View


June 3, 2013

Progress Weeks 33-34

Just catching up since it's been a couple months since I've posted.

Below are Images After: Tray 17   (taken on 2/23/2013)
Remaining Trays in Treatment: 7


Front View
Top View
Bottom View
Left View
Right View

February 17, 2013

Do liquids (or spit) get stuck under your trays?

I've seen people searching for this information, so I figured I'd post about it. The simple answer is yes.

  • Yes, you will see spit under your trays, constantly.
  • Yes, you will get any liquid you drink under your trays.
  • Yes, having liquids that aren't clear in your mouth will help to stain the inside and outside of your trays.
That's why Invisalign only suggests that you drink water with you trays on. Kind of seems like a no-brainer, but  I get it. How can you know before you experience it right?

Think about it like this. The trays are pretty tight over your teeth, but they aren't air tight. Sometimes I'll drink water with supplement powder in it. I usually find pieces of the powder stuck under my trays the next time I take them off. Not a lot, but some.

Spit under tray. Oh nooooo. ;)
The solution? Swish with water, while your trays are on. It really does help. Also you can "suck" the excess liquid (or spit) out of your trays if you have excess stuck under there. Its not a big deal. Most people can't see it.

February 16, 2013

Progress Weeks 31-32

I had my teeth cleaned before putting on this tray. You can REALLY see the space between my front two bottom teeth created during the Interproximal Reduction. It's kind of crazy. My Invisalign dentist still hasn't done the IR on the top teeth, which I'm kind of worried about. I don't think I need as much taken off as the plan calls for. When I got my teeth cleaned, the other dentist agreed and mentioned that she would talk to my Invisalign dentist about possibly getting the plan restructured. I'm not really sure how that works. Seems like they have to call Invisalign and get permission to make any small change, even when the dentist the one performing the reduction. Kind of crazy. I'm going in next week, so I'll find out then what the plan is. I don't want them to take too much off my teeth. Once its gone, its gone.

Below are Images After: Tray 16   (taken on 2/7/2013)
Remaining Trays in Treatment: 8

Lockjaw: Bout the same as always.
Pain: On the first couple days after the tray was put on.

Wear: 12-20 hours a day (less than I'm supposed to)
Brushing: Not as much as I should during the day at work
Flossing: Not every night like I should.

Front View - Notice the space between the front bottom teeth
Top View
Bottom View
Left View
Right View

Progress Weeks 29-30

Below are Images After: Tray 15   (taken on 1/24/2013)
Remaining Trays in Treatment: 9

Lockjaw: Bout the same as always.
Pain: On the first couple days after the tray was put on.

Wear: 12-20 hours a day (less than I'm supposed to)
Brushing: Not as much as I should during the day at work
Flossing: Not every night like I should.

Front View
Top View
Bottom View

January 20, 2013

My Interproximal Reduction (Shaving Tooth Enamel)

How Your Dentist Determines You Need Interproximal Reduction

The process of shaving tooth enamel is called interproximal reduction. In this post I describe the process and the details of my experience. If your teeth are crowded like mine, you may need interproximal reduction as part of your Invisalign treatment. It's not always an option though. Some dentists choose to remove teeth to make room - which is far more painful and requires recovery time. If your dentist wants you to remove teeth to make room, you may want get a second opinion.

In my case, the dentist told me he'd rather avoid removing teeth and instead choose to shave the enamel of teeth on the top and bottom. Talk about dodging a bullet! My treatment currently calls for 7 reductions of .5 millimeters on the top and 7 reductions of .2 millimeters on the bottom.


What happens when you get Interproximal Reduction

I wasn't able to get pictures when I had my reductions done, but I compiled some pictures I found online to give you an idea of what happens. Different dentists will use different tools, but the process is generally the same. My dentist used diamond strips, which are ultra thin and slide between the teeth. Once the diamond strip is between your teeth, the dentist will slide it back and forth to shave the tooth. It kind of works likes a cheese grater, which sounds gross, but it's not painful at all.

Diamond strips
I highly recommend asking your dentist for a local numbing agent on your gums. Depending on how steady of a hand your dentist has (and probably how crazy the angle is they have to work at) the only thing that will hurt is getting your gums slices by the diamond strip. It kind of feels like a paper cut anywhere the strip slides over on your gums/flesh. I had minimal issues when I had the bottom done.

To ensure the correct amount has been taken off of your teeth, your dentist will slide a gauge key into the space between the teeth. The space you need created totally depends on your plan. An example is shown below, note again these are not my teeth.

Gauge set

My Interproximal Reduction

Below are the pictures showing where I've had reduction on my bottom teeth. It's not a huge difference, but you can definitely tell when you look at my before and after pictures from my progress page.

Interproximal Reduction on bottom
I can see that some of the attachment glue got shaved off on a couple of the teeth in the close up above, but it's not noticable in person. Let me know if you have questions.